Protected Routes in React Router Explained
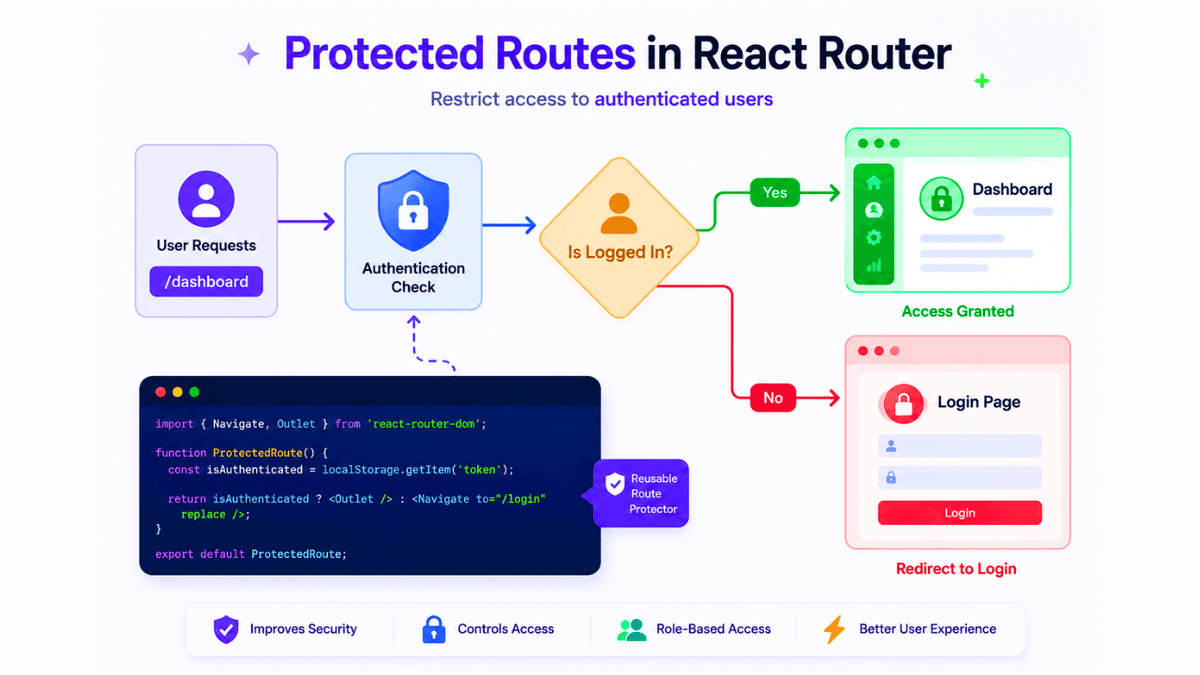
Learn how to create Protected Routes in React Router. Understand authentication, authorization, Navigate, Outlet, route guards, and secure React applications.
Protected Routes in React Router: Restrict Access to Authenticated Users
Not every page in a web application should be accessible to everyone.
For example:
- Dashboard
- User Profile
- Account Settings
- Order History
- Admin Panel
These pages usually require users to log in before accessing them.
If an unauthenticated user tries to visit these pages, they should be redirected to the login page.
This is where Protected Routes become important.
Protected Routes allow developers to control access to specific routes based on authentication or authorization rules.
In this guide, you'll learn what Protected Routes are, how they work, and how to implement them using React Router.
Prerequisites
Before learning Protected Routes, make sure you understand:
These concepts are commonly used when implementing authentication systems.
What Are Protected Routes?
Protected Routes are routes that can only be accessed by authorized users.
Example:
  /dashboard

/profile

/settings
Users must be authenticated before viewing these pages.
Why Do We Need Protected Routes?
Imagine an online banking application.
Without route protection:
/dashboard
Anyone could access sensitive information simply by entering the URL.
Protected Routes prevent unauthorized access.
Benefits:
- improved security
- better user experience
- access control
- role-based permissions
- safer applications
Understanding Route Protection
Normal Route:
  User

↓

Visits Page

↓

Page Loads
Protected Route:
  User

↓

Authentication Check

↓

Allowed?
   ├── Yes → Load Page
   └── No → Redirect Login
This is the basic idea behind route protection.
How Protected Routes Work
The application checks:
isAuthenticated
If:
true
Render the page.
If:
false
Redirect to:
/login
Creating a Protected Route Component
Example:
  import {
  Navigate
} from "react-router-dom";

function ProtectedRoute({
  children
}) {

  const isAuthenticated =
    true;

  return isAuthenticated
    ? children
    : (
      <Navigate
        to="/login"
      />
    );

}
This component protects routes automatically.
Protecting a Route
Example:
  <Route
  path="/dashboard"
  element={
    <ProtectedRoute>
      <Dashboard />
    </ProtectedRoute>
  }
/>
Flow:
  User Visits Dashboard

↓

Authentication Check

↓

Dashboard
or
Login Page
Complete Example
ProtectedRoute Component
  import {
  Navigate
} from "react-router-dom";

function ProtectedRoute({
  children
}) {

  const isAuthenticated =
    localStorage.getItem(
      "token"
    );

  if (
    !isAuthenticated
  ) {

    return (
      <Navigate
        to="/login"
        replace
      />
    );

  }

  return children;
}

export default ProtectedRoute;
Route Setup
  <Route
  path="/dashboard"
  element={
    <ProtectedRoute>
      <Dashboard />
    </ProtectedRoute>
  }
/>
Now only authenticated users can access the dashboard.
Understanding Navigate
React Router provides:
Navigate
Import:
  import {
  Navigate
} from "react-router-dom";
Example:
  <Navigate
  to="/login"
/>
This redirects users automatically.
Protecting Multiple Routes
Instead of protecting routes one by one:
  <Route
  path="/profile"
/>

<Route
  path="/settings"
/>

<Route
  path="/orders"
/>
Use Nested Routes.
Example:
  <Route
  element={
    <ProtectedRoute />
  }
>

  <Route
    path="/profile"
    element={<Profile />}
  />

  <Route
    path="/settings"
    element={<Settings />}
  />

  <Route
    path="/orders"
    element={<Orders />}
  />

</Route>
This scales much better.
Protected Routes Using Outlet
Example:
  import {
  Navigate,
  Outlet
} from "react-router-dom";

function ProtectedRoute() {

  const isAuthenticated =
    true;

  return isAuthenticated
    ? <Outlet />
    : (
      <Navigate
        to="/login"
      />
    );

}
Route setup:
  <Route
  element={
    <ProtectedRoute />
  }
>

  <Route
    path="/dashboard"
    element={<Dashboard />}
  />

  <Route
    path="/profile"
    element={<Profile />}
  />

</Route>
This is a common production approach.
Using Context API for Authentication
Most applications store authentication state globally.
Example:
  const {
  user
} = useAuth();
Protected Route:
  return user
  ? <Outlet />
  : (
    <Navigate
      to="/login"
    />
  );
This keeps authentication logic centralized.
Role-Based Route Protection
Some applications require roles.
Example:
  Admin

Editor

User
Route:
  if (
  user.role !==
  "admin"
) {

  return (
    <Navigate
      to="/"
    />
  );

}
Only administrators can access the page.
Real Project Usage
SaaS Applications
Protected pages:
  /dashboard

/billing

/settings
E-commerce Applications
Protected pages:
  /orders

/profile

/cart
Admin Panels
Protected pages:
  /admin

/users

/analytics
These routes should never be publicly accessible.
Common Real-World Use Cases
Protected Routes are commonly used for:
- dashboards
- user profiles
- account settings
- billing pages
- order history
- admin panels
- learning platforms
Most modern applications require route protection.
Protected Routes vs Public Routes
Public Routes
Example:
  /home

/about

/contact
Accessible to everyone.
Protected Routes
Example:
  /dashboard

/profile

/settings
Require authentication.
Common Beginner Mistakes
Relying Only on Frontend Protection
Incorrect:
Frontend Check Only
Always protect APIs on the backend as well.
Frontend protection improves UX but is not a security boundary.
Forgetting Replace
Incorrect:
  <Navigate
  to="/login"
/>
Better:
  <Navigate
  to="/login"
  replace
/>
This prevents users from returning to protected pages using the Back button.
Repeating Authentication Logic
Avoid checking authentication inside every page.
Create a reusable ProtectedRoute component.
Storing Sensitive Data Incorrectly
Avoid storing sensitive information directly in localStorage.
Use secure authentication strategies.
Protected Routes Interview Questions
- What are Protected Routes?
- Why are Protected Routes important?
- What is the purpose of Navigate?
- How do you redirect unauthorized users?
- What is the difference between Public and Protected Routes?
- How can Context API help with authentication?
- What are Role-Based Protected Routes?
Watch Full Protected Routes Tutorial
If you prefer video learning, watch the complete tutorial below where we build authentication systems and route protection using React Router.
Watch the Full Protected Routes Tutorial
This tutorial demonstrates authentication patterns commonly used in production applications.
Build Something
Practice Protected Routes by creating:
- Login System
- Admin Dashboard
- SaaS Dashboard
- E-commerce User Panel
- Learning Management System
These projects will help you understand authentication workflows.
Production Tip
Professional React developers usually:
- protect routes using reusable wrappers
- centralize authentication state
- implement role-based access control
- protect backend APIs separately
- redirect users intelligently after login
A strong route protection strategy improves both security and user experience.
Why Protected Routes Matter
Modern applications contain sensitive pages that should not be accessible to everyone.
Protected Routes ensure only authorized users can access restricted content while maintaining a smooth navigation experience.
They are a fundamental part of modern authentication systems.
Conclusion
Protected Routes allow React applications to restrict access to specific pages based on authentication and authorization rules.
Using React Router's Navigate , Outlet , and reusable route wrappers, developers can create secure and scalable applications.
Mastering Protected Routes is essential for building professional React applications that handle user authentication correctly.