Rate Limiting in Node.js: Protect APIs From Brute Force, Abuse, and Traffic Spikes
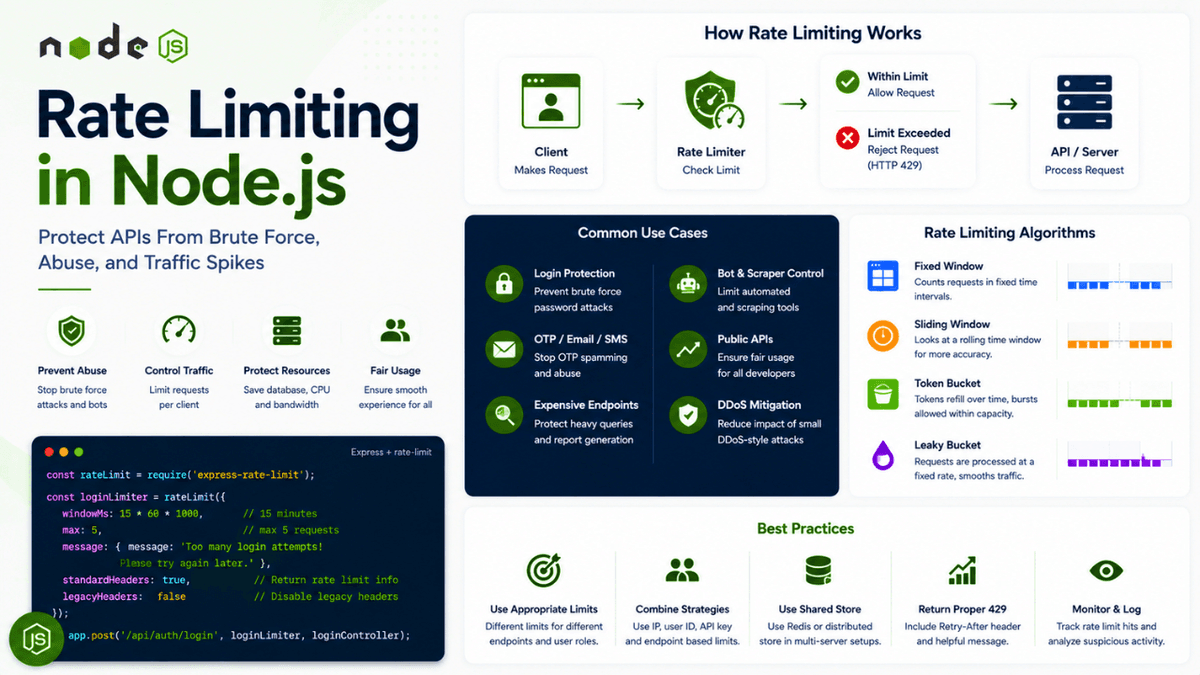
Learn how rate limiting works in Node.js and how to protect APIs from brute-force attacks, abuse, DDoS-like traffic, and excessive requests using practical production-ready strategies.
Rate Limiting in Node.js: Protect APIs From Brute Force, Abuse, and Traffic Spikes
Imagine you build a login API:
POST /api/auth/login
A normal user might make a few requests.
But an attacker could send:
  10 requests
100 requests
1,000 requests
100,000 requests
in a short period of time.
If your API accepts every request without any limits, attackers may be able to:
- Brute-force passwords
- Abuse expensive endpoints
- Spam OTP requests
- Enumerate accounts
- Consume server resources
- Overload your database
- Increase infrastructure costs
This is where rate limiting becomes important.
Rate limiting is a technique used to control how many requests a client can make within a specific period of time.
For example:
  100 requests
per 15 minutes
The basic idea is:
  Client
   ↓
Request
   ↓
Rate Limiter
   ↓
Within Limit?
  ↙      ↘
Yes       No
 ↓         ↓
Allow    Reject
Request  Request
Rate limiting is one of the most important layers in a production API security strategy.
It works alongside other security practices such as authentication, authorization, input validation, secure password hashing, and CORS.
In the previous article, we discussed how CORS controls browser-based cross-origin access. But remember that CORS does not stop an attacker from directly calling your API with scripts or other HTTP clients.
Rate limiting helps address that problem.
In this article, we'll explore:
- What rate limiting is
- Why APIs need rate limiting
- Brute-force protection
- Rate limits vs quotas
- Fixed window algorithm
- Sliding window algorithm
- Token bucket algorithm
- Leaky bucket algorithm
- IP-based rate limiting
- User-based rate limiting
- Endpoint-specific limits
- Login rate limiting
- Express rate limiting
- Distributed rate limiting
- Redis-based rate limiting
- HTTP
429responses - Rate limit headers
- Common mistakes
- Production best practices
What Is Rate Limiting?
Rate limiting controls the frequency of requests allowed from a client.
For example:
  100 requests
within 60 seconds
If the client stays below the limit:
  Request 1  → Allowed
Request 2  → Allowed
Request 3  → Allowed
...
Request 100 → Allowed
When the client exceeds the limit:
  Request 101
     ↓
Rate Limit Exceeded
     ↓
HTTP 429
The server can then temporarily reject additional requests.
Why Do APIs Need Rate Limiting?
Without rate limiting, every endpoint is potentially exposed to unlimited traffic.
Consider a login endpoint:
POST /api/login
An attacker might try:
  password123
Password123
admin123
qwerty123
...
If the API allows unlimited attempts, the attacker can automate this process.
Rate limiting makes the attack more difficult.
For example:
  5 login attempts
per 15 minutes
The attacker cannot continuously submit thousands of guesses from the same client without hitting the limit.
Rate Limiting Is Defense in Depth
Rate limiting should not be your only security mechanism.
A secure authentication system might look like:
  Input Validation
       ↓
Rate Limiting
       ↓
Authentication
       ↓
Authorization
       ↓
Business Logic
       ↓
Database
Each layer has a different purpose.
For example:
- Password hashing protects stored credentials.
- Authentication verifies identity.
- Authorization controls permissions.
- CORS controls browser cross-origin access.
- Rate limiting controls request frequency.
Security works best when these controls work together.
Rate Limiting vs Quotas
These concepts are related but different.
Rate Limit
Controls how quickly requests can be made.
Example:
100 requests per minute
Quota
Controls the total amount of usage allowed over a larger period.
Example:
10,000 requests per month
You can have both:
  Rate Limit:
100 requests/minute

Monthly Quota:
100,000 requests/month
A rate limit protects your system from sudden bursts.
A quota controls overall consumption.
HTTP 429 Too Many Requests
When a client exceeds a rate limit, the standard HTTP status code is:
429 Too Many Requests
For example:
HTTP/1.1 429 Too Many Requests
A JSON API might return:
  {
  "message": "Too many requests. Please try again later."
}
The response should be clear without revealing unnecessary internal details.
Retry-After Header
You can also tell the client when it should try again.
For example:
Retry-After: 60
This indicates that the client should wait before retrying.
A response might look like:
  HTTP/1.1 429 Too Many Requests
Retry-After: 60
Content-Type: application/json
This is especially useful for clients that automatically handle rate limiting.
Fixed Window Rate Limiting
One of the simplest rate limiting strategies is the fixed window algorithm.
Imagine:
  Limit:
100 requests

Window:
60 seconds
You divide time into fixed periods:
  12:00:00 → 12:00:59
12:01:00 → 12:01:59
12:02:00 → 12:02:59
For each window, you count requests.
Conceptually:
  Window 1
Requests: 75
Status: Allowed


Window 2
Requests: 100
Status: Limit Reached
Once the window resets:
Counter = 0
and the client can make requests again.
Fixed Window Problem
Fixed windows can create a burst problem.
Imagine the limit is:
100 requests/minute
A client sends:
  100 requests
at 12:00:59
Then:
  100 requests
at 12:01:00
Technically, both requests fall into different windows.
The client has made:
  200 requests
in approximately 2 seconds
This is one weakness of the fixed-window algorithm.
Sliding Window Rate Limiting
A sliding window considers the previous time period relative to the current request.
For example:
  Limit:
100 requests

Window:
60 seconds
At any moment, the system looks at:
Current Time - 60 seconds
and counts requests inside that period.
Conceptually:
  12:00:30
   ↓
Look back 60 seconds
   ↓
Count requests
   ↓
Check limit
This produces smoother behavior than a simple fixed window.
However, it may require more complex storage and computation.
Token Bucket Algorithm
The token bucket algorithm is another popular approach.
Imagine a bucket that can hold:
100 tokens
Each request consumes:
1 token
Tokens are added over time at a fixed rate.
For example:
  Bucket Capacity:
100 tokens

Refill Rate:
10 tokens/second
Conceptually:
          Refill
          ↓
     ┌─────────┐
     │ Tokens  │
     │  █████  │
     └────┬────┘
          ↓
       Request
          ↓
     Consume Token
If tokens are available:
  Request
   ↓
Token Available
   ↓
Allow
If the bucket is empty:
  Request
   ↓
No Token
   ↓
Reject
One advantage of token buckets is that they can allow controlled bursts while maintaining an average request rate.
Leaky Bucket Algorithm
The leaky bucket algorithm works differently.
Imagine requests entering a queue:
  Requests
   ↓
┌───────────┐
│   Queue   │
└─────┬─────┘
      ↓
Fixed Processing Rate
      ↓
Server
Requests are processed at a relatively consistent rate.
This can help smooth traffic.
The key difference is that token buckets generally focus on controlling available request capacity, while leaky buckets focus on controlling the processing rate.
Which Algorithm Should You Use?
There is no universal answer.
A simple application might use:
Fixed Window
A more advanced API may use:
Sliding Window
A system that needs controlled bursts might use:
Token Bucket
A traffic-shaping system might use:
Leaky Bucket
Your choice depends on:
- Traffic patterns
- Infrastructure
- Endpoint behavior
- Distributed architecture
- Accuracy requirements
- Performance requirements
For many web applications, using a mature rate-limiting library is preferable to implementing the algorithm from scratch.
IP-Based Rate Limiting
One simple strategy is to limit requests by IP address.
For example:
  IP:
203.0.113.10

Limit:
100 requests/minute
The server tracks:
203.0.113.10 → 75 requests
Once the client reaches the limit:
203.0.113.10 → 100 requests
Additional requests are rejected.
This is easy to understand and useful for public APIs.
However, IP addresses are not always reliable identities.
Problems With IP-Based Limiting
Imagine many users are behind the same network.
For example:
  Office Network
      ↓
One Public IP
      ↓
100 Employees
If you apply a strict IP limit, one user could consume the entire quota.
Other users might then be blocked.
The same problem can happen with:
- Universities
- Public Wi-Fi
- Mobile networks
- Corporate networks
Therefore, IP-based limiting should not always be the only strategy.
Proxies and Load Balancers
In production, your Node.js server may sit behind:
  Browser
   ↓
CDN
   ↓
Load Balancer
   ↓
Reverse Proxy
   ↓
Node.js
The direct TCP connection to Node.js may come from the proxy rather than the original client.
Therefore, determining the real client IP requires careful infrastructure configuration.
In Express applications, proxy settings such as trust proxy must be configured appropriately for your deployment environment.
Never blindly trust arbitrary forwarding headers from untrusted clients.
Incorrect proxy configuration can make IP-based rate limiting ineffective.
User-Based Rate Limiting
For authenticated APIs, you can rate limit by user identity.
For example:
  User ID:
12345

Limit:
1,000 requests/hour
This can be more meaningful than IP-based limiting.
For example:
  User A → 100 requests
User B → 100 requests
User C → 100 requests
Each user gets an independent limit.
However, this requires authentication.
Unauthenticated endpoints still need another identifier.
That's why production systems often combine multiple strategies.
Combining IP and User Limits
Consider:
  Anonymous Requests
        ↓
IP-Based Limit
and:
  Authenticated Requests
        ↓
User-Based Limit
You can also combine them:
  IP Limit
   +
User Limit
   +
Endpoint Limit
For example:
  IP:
100 requests/minute

User:
1,000 requests/hour

Login:
5 attempts/15 minutes
This layered strategy can provide stronger protection.
Endpoint-Specific Rate Limits
Not every endpoint should have the same rate limit.
Consider these endpoints:
  GET /api/products
POST /api/auth/login
POST /api/auth/forgot-password
POST /api/send-otp
GET /api/profile
They have different security and resource requirements.
You might use:
  Products:
1,000 requests/minute

Profile:
300 requests/minute

Login:
5 attempts/15 minutes

Forgot Password:
3 requests/hour

Send OTP:
3 requests/10 minutes
This is much more effective than applying one global limit to every endpoint.
Login Rate Limiting
Authentication endpoints are especially sensitive.
For example:
POST /api/login
could be targeted by:
- Brute-force attacks
- Credential stuffing
- Password spraying
A simple strategy might limit:
  5 failed attempts
per 15 minutes
But be careful.
If you only rate limit by IP, an attacker can rotate IP addresses.
If you only rate limit by account, an attacker could intentionally target someone else's account and lock them out.
Therefore, authentication rate limiting should be designed carefully.
Credential Stuffing
Credential stuffing is different from traditional brute force.
An attacker may have a database of leaked credentials:
  user1@example.com
password123

user2@example.com
qwerty123

user3@example.com
...
They test these credentials against your application.
Rate limiting can slow this activity.
Additional protections may include:
- MFA
- Strong password hashing
- Breached-password detection
- Login anomaly detection
- Device or risk analysis
- Account monitoring
Rate limiting is one layer—not the complete solution.
Forgot Password Rate Limiting
Password reset endpoints are also sensitive.
Consider:
POST /api/forgot-password
An attacker could repeatedly trigger password reset emails.
This could:
- Spam users
- Increase email costs
- Abuse your email provider
- Create a denial-of-service effect against users
A dedicated rate limit can help:
  3 requests
per hour
You should also consider response consistency so attackers cannot easily determine whether an email address is registered.
OTP Rate Limiting
OTP endpoints should be heavily protected.
For example:
POST /api/send-otp
Without rate limiting, attackers may trigger thousands of SMS or email messages.
This can become expensive.
You may use multiple limits:
  Per IP
Per User
Per Phone Number
Per Email
For example:
  3 OTP requests
per 10 minutes
and:
  10 OTP verification attempts
per hour
The exact policy depends on your application.
API Key Rate Limiting
If your API uses API keys, you can rate limit based on the key.
For example:
  API Key A
→ 10,000 requests/day

API Key B
→ 100,000 requests/day
This is useful for developer platforms and public APIs.
You can also implement plans:
  Free:
100 requests/minute

Pro:
1,000 requests/minute

Enterprise:
Custom
This becomes part of your API product architecture.
Rate Limiting Expensive Endpoints
Some endpoints consume significantly more resources.
For example:
GET /api/search
might execute complex database queries.
Or:
POST /api/report
might generate a large report.
Or:
POST /api/export
might process millions of database records.
These endpoints should often have stricter limits.
For example:
  Normal API:
100 requests/minute

Report Generation:
5 requests/minute
Rate limiting can protect expensive operations from accidental or malicious overload.
Express Rate Limiting
In Express applications, you can use a mature rate-limiting middleware rather than implementing everything manually.
A common approach uses the express-rate-limit package.
Conceptually:
  const rateLimit = require(
  "express-rate-limit"
);

const limiter = rateLimit({
  windowMs:
    15 * 60 * 1000,

  limit: 100,

  message: {
    message:
      "Too many requests. Please try again later."
  }
});

app.use(
  "/api",
  limiter
);
This creates a basic API-level limit.
The exact configuration should be reviewed against the current package version and your production architecture.
Global vs Route-Specific Limiting
You can apply a limiter globally:
  app.use(
  "/api",
  apiLimiter
);
Or to specific routes:
  app.post(
  "/api/auth/login",
  loginLimiter,
  loginController
);
This allows you to create different policies.
For example:
  Global API:
100 requests/minute

Login:
5 attempts/15 minutes

Password Reset:
3 requests/hour
This is usually more practical than one limit for everything.
In-Memory Rate Limiting
A basic rate limiter might store counters in memory:
  Node.js Process
      ↓
Memory
      ↓
IP → Request Count
For example:
  203.0.113.1 → 50
203.0.113.2 → 20
203.0.113.3 → 75
This can work for development or a simple single-process application.
But it creates problems in production.
The Multiple Server Problem
Imagine you run:
  Load Balancer
   ↓
   ├── Node.js Server A
   ├── Node.js Server B
   └── Node.js Server C
Each server has its own memory.
So:
  Server A:
IP → 90 requests

Server B:
IP → 10 requests

Server C:
IP → 50 requests
The actual client has made:
150 requests
But no individual server knows the complete count.
The rate limit becomes inaccurate.
This is why distributed systems often need shared rate-limit storage.
Distributed Rate Limiting
A distributed rate limiter stores counters in a shared system.
For example:
               Load Balancer
                   ↓
        ┌──────────┼──────────┐
        ↓          ↓          ↓
    Node A      Node B      Node C
        └──────────┼──────────┘
                   ↓
              Redis
                   ↓
            Shared Counters
Now every Node.js instance can access the same rate-limit state.
This makes rate limiting more consistent across multiple servers.
Redis for Rate Limiting
Redis is commonly used for high-performance shared counters.
Conceptually:
  Client Request
      ↓
Node.js
      ↓
Redis
      ↓
Check Counter
      ↓
Within Limit?
   ↙       ↘
 Yes        No
  ↓          ↓
Increment   429
  ↓
Continue
Redis provides operations that can be useful for atomic counters and expiration.
A production implementation should use a well-maintained rate-limiting library or proven algorithm rather than manually creating an incomplete distributed locking system.
Atomic Operations Matter
Imagine two requests arrive simultaneously:
  Request A → Counter = 99
Request B → Counter = 99
Both read:
99
Both decide:
99 < 100
Both increment.
You might end up with incorrect behavior.
Distributed rate limiting requires atomic operations or carefully designed algorithms.
This is one reason Redis-based implementations often rely on atomic commands or Lua scripts.
Rate Limiting With Redis
A conceptual Redis key might look like:
rate-limit:ip:203.0.113.10
or:
rate-limit:user:12345
The system stores:
  Counter
Expiration
For example:
  rate-limit:user:12345
count = 75
expires = 60 seconds
When a request arrives:
  1. Read counter
2. Check limit
3. Increment atomically
4. Set or preserve expiration
5. Allow or reject
The implementation details depend on the chosen algorithm.
Rate Limit Headers
APIs can communicate rate-limit information using response headers.
For example:
  RateLimit-Limit: 100
RateLimit-Remaining: 45
RateLimit-Reset: 60
These tell clients:
  Limit:
100

Remaining:
45

Reset:
60 seconds
The exact header conventions depend on your API design and tooling.
Providing clear rate-limit information can help API consumers build better clients.
Handling 429 Responses in Clients
A client should not blindly retry immediately.
Bad:
  429
 ↓
Retry
 ↓
429
 ↓
Retry
 ↓
429
This can make the problem worse.
Instead:
  429
 ↓
Read Retry-After
 ↓
Wait
 ↓
Retry
For automated systems, exponential backoff with jitter can help prevent synchronized retry storms.
For example:
  1 second
2 seconds
4 seconds
8 seconds
with random jitter added.
Rate Limiting and Retry Storms
Imagine thousands of clients receive:
429
and all retry at exactly:
10:00:00
This creates a traffic spike.
Instead, clients should spread retries over time.
Conceptually:
  Request
  ↓
429
  ↓
Backoff
  ↓
Random Jitter
  ↓
Retry
This is particularly important in distributed systems.
Rate Limiting vs DDoS Protection
Rate limiting can help control excessive traffic.
But it is not a complete DDoS protection system.
If an attacker sends millions of requests, your application may still be overwhelmed before your Node.js process can apply its own rate limiter.
For large-scale attacks, protection may need to happen earlier:
  Internet
   ↓
CDN / Edge Network
   ↓
WAF
   ↓
Load Balancer
   ↓
Rate Limiting
   ↓
Node.js
Edge-level protection can absorb or filter malicious traffic before it reaches your application infrastructure.
Rate Limiting at Multiple Layers
A production architecture may use:
  Layer 1:
CDN / Edge Rate Limit

Layer 2:
API Gateway Rate Limit

Layer 3:
Application Rate Limit

Layer 4:
User / Endpoint Rate Limit
For example:
  Global:
10,000 requests/minute/IP

API:
1,000 requests/minute/user

Login:
5 failed attempts/15 minutes

OTP:
3 requests/10 minutes
This creates layered protection.
Rate Limiting and Authentication
You should think carefully about when rate limiting happens.
For public endpoints:
  Request
   ↓
Rate Limit
   ↓
Authentication
For authenticated endpoints:
  Request
   ↓
Identify User
   ↓
Rate Limit User
   ↓
Authorization
For login endpoints:
  Request
   ↓
IP / Device / Account Signals
   ↓
Rate Limit
   ↓
Password Verification
The exact architecture depends on your security model.
Rate Limiting and Account Lockouts
Permanent account lockouts can create denial-of-service opportunities.
Imagine an attacker intentionally submits incorrect passwords for another user's account.
If your application permanently locks the account:
  Attacker
   ↓
Wrong Password
   ↓
Account Locked
   ↓
Real User Cannot Login
This can be abused.
Temporary throttling is often safer than permanent lockouts.
For example:
  5 failed attempts
   ↓
Wait 15 minutes
The exact strategy should depend on your risk profile.
Rate Limiting Error Messages
Keep error responses clear but not overly detailed.
For example:
  {
  "message": "Too many requests. Please try again later."
}
Avoid exposing internal information such as:
Your Redis key has expired.
or:
Your IP counter reached 100.
Internal implementation details don't need to be exposed to clients.
Logging Rate Limit Events
Rate-limit events are valuable security signals.
You may want to log:
  Timestamp
Endpoint
Client identifier
User ID (if available)
Rate limit type
Request result
For example:
  {
  "event": "rate_limit_exceeded",
  "route": "/api/auth/login",
  "userId": "12345"
}
Be careful with sensitive data.
Never log passwords, authentication tokens, or other secrets.
The logging practices from our earlier Logging in Node.js article are directly relevant here.
Monitoring Rate Limits
Rate limiting should be observable.
Useful metrics include:
  Total Requests
429 Responses
Requests Per Endpoint
Requests Per IP
Requests Per User
Rate Limit Hit Rate
For example:
  /api/login
429 rate:
12%
A sudden increase might indicate:
- Brute-force attacks
- Credential stuffing
- Bot traffic
- Misconfigured clients
- Unexpected traffic spikes
Rate limiting is not just a security feature.
It's also an operational signal.
Don't Set the Same Limit Everywhere
A common mistake is:
100 requests/minute
for every endpoint.
This ignores the actual cost of each operation.
Instead:
  GET /products
1000/min

POST /orders
100/min

POST /login
5/15min

POST /send-otp
3/10min

POST /generate-report
5/min
Rate limits should reflect:
- Resource cost
- Security sensitivity
- User expectations
- Business requirements
Don't Trust Only IP Addresses
IP-based limiting is useful, but IP addresses aren't perfect identities.
A single IP may represent:
100 users
or one attacker may rotate across:
1,000 IP addresses
Consider combining:
  IP
User ID
API Key
Account
Endpoint
depending on your application.
Don't Build a Rate Limiter Without Considering Distribution
A rate limiter that works perfectly on one server may fail when you add:
  Load Balancer
+
Multiple Node.js Instances
Always ask:
Where is the rate-limit state stored?
If the answer is:
Local process memory
you need to understand the limitations.
For horizontally scaled applications, shared state or edge-level rate limiting may be necessary.
Don't Rate Limit Only After Expensive Work
This is inefficient:
  Request
   ↓
Database Query
   ↓
Complex Calculation
   ↓
Rate Limit Check
   ↓
Reject
The expensive work already happened.
Instead:
  Request
   ↓
Rate Limit Check
   ↓
Authentication
   ↓
Validation
   ↓
Expensive Work
Apply rate limiting early enough to protect expensive resources.
Rate Limiting and API Design
A good API should communicate limits clearly.
For example:
  Limit:
100 requests/minute

Remaining:
25

Reset:
30 seconds
Clients can use this information to adjust their behavior.
This is particularly important for public APIs and developer platforms.
A Practical Rate Limiting Architecture
A production Node.js API might look like:
                       Internet
                        ↓
                  CDN / WAF
                        ↓
               Edge Rate Limit
                        ↓
                Load Balancer
                        ↓
          ┌─────────────┼─────────────┐
          ↓             ↓             ↓
       Node.js       Node.js       Node.js
          └─────────────┼─────────────┘
                        ↓
                  Shared Redis
                        ↓
                 Rate Limit State
Then application-level rules:
  Public API
    ↓
IP Rate Limit

Authenticated API
    ↓
User Rate Limit

Login
    ↓
Account + IP Protection

OTP
    ↓
Phone / Email + IP Protection

Expensive Endpoint
    ↓
Strict Endpoint Limit
This is much more robust than putting one global counter in a Node.js variable.
A Simple Mental Model
Think of rate limiting as a traffic control system.
Without rate limiting:
  Cars
Cars
Cars
Cars
Cars
Cars
      ↓
Road Overloaded
With rate limiting:
  Cars
  ↓
Traffic Control
  ↓
Allowed Flow
  ↓
Road Remains Usable
The goal isn't necessarily to block users.
The goal is to control traffic so your system remains available and fair.
Rate Limiting Checklist
Before deploying a production API, ask:
  ✓ Do public endpoints have limits?
✓ Are authentication endpoints protected?
✓ Are OTP and password reset endpoints limited?
✓ Are expensive endpoints limited?
✓ Are limits different by endpoint?
✓ Do authenticated users have meaningful limits?
✓ Is IP-based limiting configured correctly behind proxies?
✓ Is distributed state required?
✓ Is Redis or another shared store needed?
✓ Are 429 responses returned correctly?
✓ Is Retry-After provided where appropriate?
✓ Are rate-limit events logged?
✓ Are rate-limit metrics monitored?
✓ Can clients safely retry?
✓ Are limits documented for API consumers?
What's Next?
Rate limiting protects your API from excessive request volume.
But even when requests are legitimate, your application still needs protection from a wide range of HTTP-based attacks and unwanted browser behavior.
That's where security middleware becomes useful.
In the next article, we'll explore Helmet.js and understand how security-related HTTP response headers can help protect Node.js applications.
We'll look at:
- Content Security Policy
-
X-Content-Type-Options -
Strict-Transport-Security - Clickjacking protection
- Referrer policies
- Permissions policies
- How Helmet configures security headers
- Common production mistakes
This will take us one step further toward building production-ready Node.js applications.
Conclusion
Rate limiting is an essential part of building reliable and secure Node.js APIs.
Without it, attackers and misbehaving clients can send unlimited requests, potentially causing:
- Brute-force attacks
- Credential stuffing
- API abuse
- OTP spam
- Resource exhaustion
- Unexpected infrastructure costs
- Traffic spikes
The basic flow is:
  Incoming Request
       ↓
Rate Limit Check
       ↓
Within Limit?
   ↙       ↘
 Yes        No
  ↓          ↓
Continue    HTTP 429
  ↓
Process
Request
The most important principles are:
- Use rate limiting on public APIs.
- Protect login and authentication endpoints.
- Apply stricter limits to sensitive operations.
- Don't rely exclusively on IP addresses.
- Consider user IDs, API keys, and endpoint-specific limits.
- Use shared state when running multiple Node.js instances.
- Consider Redis or a dedicated rate-limiting service for distributed systems.
- Return
429 Too Many Requestswhen appropriate. - Consider
Retry-Afterfor clients. - Monitor rate-limit events.
- Log useful security signals without exposing secrets.
- Use edge-level protection for large-scale attacks.
- Don't treat rate limiting as a replacement for authentication or authorization.
The best rate-limiting strategy isn't simply:
100 requests per minute
It's a policy designed around your application's actual behavior.
A production-ready system might combine:
  Edge Protection
      +
IP-Based Limits
      +
User-Based Limits
      +
Endpoint-Specific Limits
      +
Authentication Protection
      +
Monitoring
That's how rate limiting becomes more than just a middleware configuration.
It becomes part of a broader strategy for building APIs that are secure, reliable, and resilient under real-world traffic.