Helmet.js in Node.js: Secure HTTP Headers and Production Security Best Practices
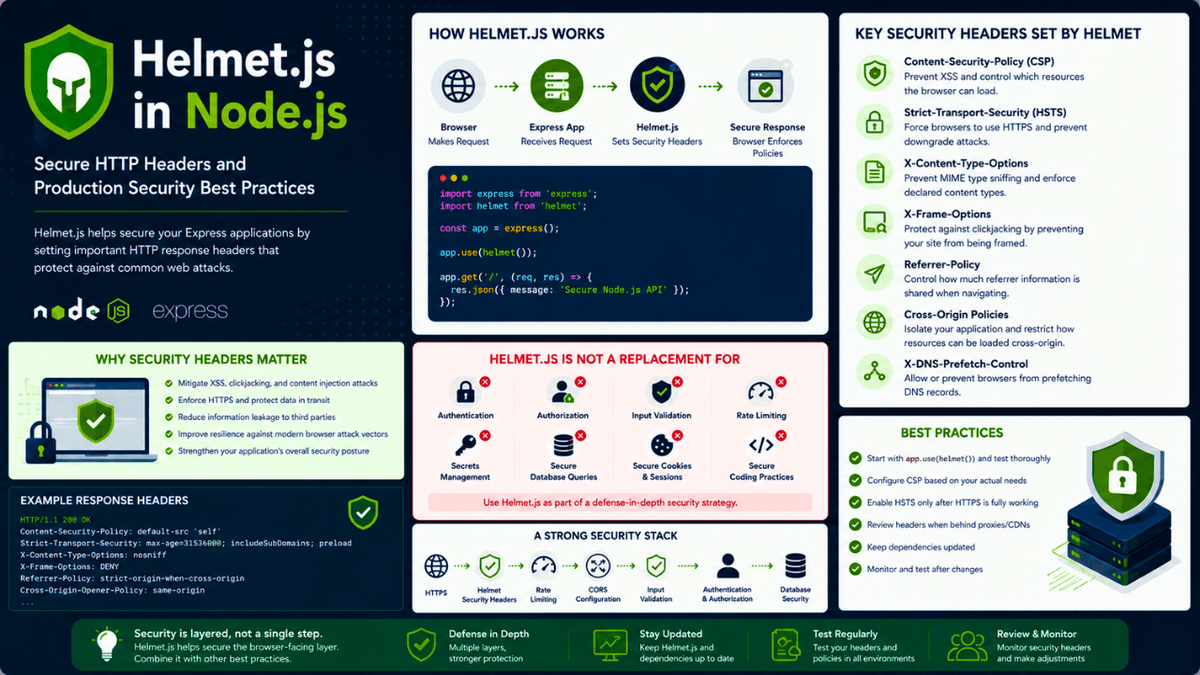
Learn how Helmet.js improves Node.js application security with HTTP headers. Understand CSP, HSTS, clickjacking protection, MIME sniffing, referrer policies, and production best practices.
Helmet.js in Node.js: Secure HTTP Headers and Production Security Best Practices
Building a secure Node.js application isn't only about writing secure authentication logic or hashing passwords correctly.
Your application also communicates with browsers through HTTP headers.
These headers can tell browsers:
- Which resources are allowed to load
- Whether the browser should enforce HTTPS
- Whether your page can be embedded in an iframe
- Whether content types should be trusted
- How much referrer information should be shared
- Which browser capabilities are available
If these security controls are missing or incorrectly configured, your application may become more vulnerable to certain classes of attacks.
This is where Helmet.js can help.
Helmet is a collection of middleware functions that helps set security-related HTTP response headers in Node.js applications, particularly Express applications.
The basic idea is:
  Browser
   ↓
HTTP Request
   ↓
Node.js / Express
   ↓
Helmet Middleware
   ↓
Security Headers
   ↓
HTTP Response
   ↓
Browser Applies Security Policies
Helmet doesn't magically make an application secure.
It doesn't replace:
- Authentication
- Authorization
- Input validation
- Rate limiting
- Secure password hashing
- CSRF defenses where applicable
- Safe database queries
- Secure session management
- Proper access control
Instead, Helmet provides another layer of defense by configuring security-related HTTP headers.
This article explains how Helmet works, which headers matter, how to configure it, and what to consider before deploying a Node.js application to production.
What Is Helmet.js?
Helmet is a Node.js middleware package designed to help secure web applications by setting various HTTP response headers.
In an Express application, you can add it as middleware:
  import express from "express";
import helmet from "helmet";

const app = express();

app.use(helmet());

app.get("/", (req, res) => {
  res.json({
    message: "Secure Node.js API",
  });
});

app.listen(3000);
The important line is:
app.use(helmet());
This enables Helmet's default security middleware configuration.
The exact headers and defaults can change between Helmet versions, so always verify the current package documentation when configuring a production application.
The important concept is that your server sends additional security instructions along with its response.
Why HTTP Security Headers Matter
When a browser receives a response, it doesn't only process the HTML or JSON body.
It also processes HTTP headers.
For example:
Content-Type: text/html
tells the browser what kind of content it is receiving.
Security headers go further.
They can tell the browser:
  Only load scripts from trusted sources.
Always use HTTPS.
Do not allow this page to be embedded.
Don't guess content types.
Don't send unnecessary referrer information.
This creates an additional security boundary between your application and the browser.
Conceptually:
  Server
   ↓
HTTP Response
   ├── Body
   └── Security Headers
          ↓
       Browser
          ↓
   Enforces Policies
The key point is that some security decisions can be enforced by the browser when your server communicates the appropriate policy.
Installing Helmet
Install Helmet using npm:
npm install helmet
For a CommonJS application:
const helmet = require("helmet");
For an ES module application:
import helmet from "helmet";
Then add it to your Express application:
app.use(helmet());
A typical Express application might look like:
  import express from "express";
import helmet from "helmet";

const app = express();

app.use(helmet());

app.use(express.json());

app.get("/", (req, res) => {
  res.json({
    message: "Hello from Node.js",
  });
});

app.listen(3000, () => {
  console.log("Server running");
});
For most applications, Helmet should be registered early in the middleware chain.
How Middleware Order Matters
Express processes middleware in the order it is registered.
For example:
  Request
   ↓
Helmet
   ↓
Body Parser
   ↓
Authentication
   ↓
Routes
   ↓
Response
A common structure is:
  app.use(helmet());

app.use(express.json());

app.use("/api", apiRoutes);

app.use(errorHandler);
The exact order depends on your architecture, but security headers generally need to be applied before responses are sent.
Remember that middleware ordering is a broader Express concept. If you're building a larger Node.js API, separating middleware, routes, controllers, services, and configuration can make the application easier to maintain.
What Security Headers Does Helmet Help With?
Helmet can configure several security-related headers.
Depending on the current Helmet version and configuration, these may include:
- Content-Security-Policy
- Strict-Transport-Security
- X-Content-Type-Options
- Referrer-Policy
- X-Frame-Options
- Cross-Origin-Opener-Policy
- Cross-Origin-Resource-Policy
- Origin-Agent-Cluster
- X-DNS-Prefetch-Control
Some older headers have been deprecated by browsers and may no longer be useful.
The important lesson is:
Don't memorize headers. Understand the security problem each policy addresses.
Let's look at the most important ones.
Content Security Policy
Content Security Policy, commonly called CSP , is one of the most powerful browser security mechanisms.
It allows you to define which sources the browser can trust for different types of resources.
For example:
  Scripts
Styles
Images
Fonts
Frames
Connections
A simple policy might look like:
default-src 'self'
This means resources should generally come from the same origin.
A more detailed policy might look conceptually like:
  default-src 'self';
script-src 'self' https://trusted.example;
style-src 'self' 'unsafe-inline';
img-src 'self' data: https:;
The exact policy depends heavily on your application.
Why CSP Matters
Imagine an attacker manages to inject malicious JavaScript into your page.
Without an effective CSP, the browser may execute the injected script.
With a properly configured CSP, the browser can refuse to execute scripts from unauthorized sources.
Conceptually:
  Injected Script
      ↓
Browser Checks CSP
      ↓
Not Allowed
      ↓
Blocked
This can reduce the impact of certain Cross-Site Scripting attacks.
However, CSP is not a replacement for preventing XSS.
You should still:
- Escape output
- Validate input
- Avoid unsafe HTML injection
- Use safe templating
- Avoid unnecessary inline scripts
CSP should be treated as an additional defense layer.
CSP With Helmet
Helmet can configure CSP:
  app.use(
  helmet({
    contentSecurityPolicy: {
      directives: {
        defaultSrc: ["'self'"],
        scriptSrc: ["'self'"],
        styleSrc: ["'self'"],
        imgSrc: ["'self'", "data:", "https:"],
      },
    },
  })
);
However, you should not copy a CSP configuration blindly.
For example, your application may use:
- Google Fonts
- Analytics
- A payment provider
- A CDN
- Image hosting
- Third-party authentication
- Embedded video
Your CSP needs to reflect the actual resources your application legitimately uses.
CSP Can Break Your Application
This is one of the most common mistakes.
You enable:
default-src 'self'
and suddenly:
  Images stop loading.
Fonts disappear.
Analytics stops working.
Third-party scripts fail.
Payment widgets break.
The reason is simple.
Your browser is enforcing the policy.
Therefore, CSP should be introduced carefully.
Start by understanding what resources your application loads.
Then define the policy based on actual requirements.
Report-Only CSP
For applications with complex frontends, you may want to test CSP before enforcing it.
A report-only policy allows you to observe violations without immediately blocking resources.
Conceptually:
  CSP Report-Only
      ↓
Browser Detects Violation
      ↓
Reports It
      ↓
Application Team Reviews
      ↓
Policy Adjusted
      ↓
Enforcement Enabled
This approach can reduce deployment surprises.
Strict-Transport-Security
HTTP Strict Transport Security is commonly called HSTS .
It tells browsers that your site should only be accessed over HTTPS.
Conceptually:
  HTTP
 ↓
Browser
 ↓
Use HTTPS
A response might include:
Strict-Transport-Security: max-age=31536000
The browser remembers the policy for the specified period.
The goal is to reduce the risk of users accessing your application over insecure HTTP connections.
HSTS Requires HTTPS
This is important.
Do not enable aggressive HSTS settings before your HTTPS deployment is correctly configured.
A production application might be structured like:
  User
  ↓
HTTPS
  ↓
Reverse Proxy / Load Balancer
  ↓
Node.js
Your infrastructure must correctly handle TLS termination and forwarded protocol information.
If your deployment environment is behind a proxy, configure Express's proxy trust settings appropriately.
Incorrect proxy configuration can cause problems with secure cookies, protocol detection, and other security behavior.
HSTS Preload
Some applications may consider HSTS preload mechanisms.
This is a serious decision.
Once a domain is included in browser preload lists, changing behavior can be difficult.
Before enabling preload-related configurations, make sure:
- HTTPS works correctly
- HTTP redirects correctly
- All relevant subdomains support HTTPS
- You understand the operational consequences
Don't enable preload simply because a security scanner recommends it.
Security configuration should match your infrastructure.
X-Content-Type-Options
This header helps prevent MIME-type sniffing.
Helmet can set:
X-Content-Type-Options: nosniff
The browser is instructed not to guess the content type in certain situations.
Conceptually:
  Server says:
This is JavaScript.

Browser:
Treat it according to declared type.
Don't guess something else.
This is a relatively simple but useful security control.
Why MIME Sniffing Matters
Browsers sometimes try to determine what content they are receiving.
This can create unexpected behavior if content is served with incorrect headers.
Using:
X-Content-Type-Options: nosniff
helps enforce the declared content type.
However, you should still configure your server to send correct Content-Type headers.
Security headers don't fix incorrectly configured content.
X-Frame-Options
X-Frame-Options controls whether a page can be displayed inside a frame.
For example:
X-Frame-Options: DENY
This tells the browser not to allow the page to be framed.
This can help protect against certain clickjacking attacks.
Imagine:
  Attacker Website
       ↓
Invisible / Misleading iframe
       ↓
Your Application
       ↓
User Click
The user thinks they are clicking one thing, but the embedded application receives the click.
Frame restrictions can help prevent this.
Clickjacking Protection
Clickjacking occurs when an attacker attempts to trick users into interacting with a hidden or disguised interface.
For applications that should never be embedded, a strict frame policy is useful.
However, some applications intentionally need embedding.
For example:
  Your Dashboard
      ↓
Embedded in
Partner Portal
In such cases, you need a more carefully designed framing policy.
This is another reason why blindly enabling security policies without understanding your application's behavior can cause problems.
Referrer-Policy
Browsers can send referrer information when users navigate from one page to another.
For example:
  https://example.com/private/page
        ↓
External Website
Depending on browser behavior and policy, the destination might receive information about where the request originated.
A referrer policy controls how much information is shared.
A common policy is:
Referrer-Policy: strict-origin-when-cross-origin
This provides a balance between useful referrer information and privacy.
You should choose the policy based on your application's requirements.
Cross-Origin Policies
Modern web applications increasingly use cross-origin resources and isolation mechanisms.
Helmet can configure policies such as:
  Cross-Origin-Opener-Policy
Cross-Origin-Resource-Policy
These policies affect how documents and resources interact across origins.
For example, Cross-Origin-Opener-Policy can help isolate browsing contexts.
Cross-Origin-Resource-Policy can control whether resources can be loaded by other origins.
These settings are powerful, but they can also break legitimate integrations.
For example:
  Your App
   ↓
Third-Party Integration
   ↓
Cross-Origin Resource
If your policy is too restrictive, the integration may stop working.
Always test cross-origin behavior after changing these headers.
Helmet Is Not CORS
This distinction is extremely important.
Helmet and CORS solve different problems.
CORS controls whether browsers allow JavaScript running on one origin to access resources on another origin.
Helmet configures security-related response headers.
For example:
  CORS
 ↓
Controls Cross-Origin Browser Requests
while:
  Helmet
 ↓
Configures Security Headers
You may use both:
  app.use(helmet());

app.use(cors({
  origin: "https://your-frontend.example",
}));
The exact CORS configuration should be based on your application's trusted origins.
Never assume:
cors()
is automatically a secure production configuration.
In the previous article about rate limiting, we discussed how security should be layered. The same principle applies here.
Helmet Is Not Authentication
Helmet does not determine whether a user is logged in.
It doesn't verify:
  JWT
Session
Cookie
Password
OAuth Token
Your authentication system still needs to handle identity.
The architecture is:
  Request
   ↓
Security Headers
   ↓
Rate Limiting
   ↓
Authentication
   ↓
Authorization
   ↓
Validation
   ↓
Business Logic
Each layer solves a different problem.
Helmet Is Not Input Validation
Suppose your API receives:
  {
  "email": "invalid"
}
Helmet doesn't validate it.
You still need input validation.
For example:
  Request
   ↓
Validate Input
   ↓
Reject Invalid Data
Security headers protect the browser interaction layer.
Input validation protects your application logic and data-processing layer.
Helmet Is Not a Replacement for Secure Coding
You can install Helmet and still build an insecure application.
For example:
  app.get("/user", async (req, res) => {
  const user = await User.findById(req.query.id);

  res.json(user);
});
If authorization is missing, one user may be able to access another user's data.
Helmet doesn't solve this.
You still need:
- Authentication
- Authorization
- Object-level access control
- Input validation
- Secure database operations
Think of Helmet as one component of your security architecture.
A Production Security Stack
A mature Node.js API might have:
                     Internet
                       ↓
                 CDN / WAF
                       ↓
              Reverse Proxy
                       ↓
             Security Headers
                 Helmet
                       ↓
              Rate Limiting
                       ↓
              Request Parsing
                       ↓
             Input Validation
                       ↓
              Authentication
                       ↓
              Authorization
                       ↓
             Business Logic
                       ↓
                  Database
This layered model is much more effective than relying on one library.
Helmet Configuration
For many Express applications, starting with:
app.use(helmet());
is a reasonable baseline.
You can then customize individual policies.
For example:
  app.use(
  helmet({
    contentSecurityPolicy: {
      directives: {
        defaultSrc: ["'self'"],
      },
    },
  })
);
But remember:
Security configuration should be based on your application, not copied from another project.
A blog, SaaS application, REST API, admin dashboard, and payment platform may all need different policies.
API-Only Applications
If you're building a pure JSON API, some browser-focused policies may be less relevant to your API responses than they are to HTML pages.
For example:
  REST API
   ↓
Returns JSON
instead of:
  Web Application
   ↓
Returns HTML
The security requirements differ.
However, your API may still serve:
- Documentation
- Swagger UI
- Admin interfaces
- Static assets
- Authentication pages
Therefore, don't assume that an API has no browser security concerns.
Helmet With Next.js
If your architecture uses Next.js for the frontend and Node.js/Express for the backend, you may configure security headers at multiple layers.
For example:
  Browser
   ↓
Next.js
   ↓
API Request
   ↓
Node.js API
The frontend can configure headers for pages it serves.
The backend can configure headers for API responses.
This creates an important architectural question:
Which server is responsible for which security policy?
Avoid assuming that adding Helmet to your backend automatically secures your Next.js frontend.
Each layer needs appropriate configuration.
This is particularly important when designing a production MERN + Next.js architecture.
Security Headers and Static Files
If your Node.js application serves static files:
app.use(express.static("public"));
you should consider how security headers apply to those resources.
A request might be:
GET /styles.css
or:
GET /app.js
The browser still processes these resources under security policies.
Your middleware configuration should ensure that appropriate headers are applied consistently where needed.
Security Headers and APIs
For JSON APIs, a typical response might look like:
  HTTP/1.1 200 OK
Content-Type: application/json
X-Content-Type-Options: nosniff
Referrer-Policy: strict-origin-when-cross-origin
The exact headers depend on your Helmet configuration and application requirements.
The important thing is to understand what the headers do instead of blindly chasing a perfect security scanner score.
Security Scanners Are Helpful, Not Absolute
You may run a security scanner and see:
Missing Security Header
The correct response isn't always:
Add Every Header
Instead ask:
  What threat does this header address?
Does my application need it?
Will it break a legitimate feature?
Is it already enforced elsewhere?
For example:
  CDN
 ↓
Adds HSTS

Application
 ↓
Adds Helmet
You should understand which layer owns each responsibility.
Common Helmet Mistakes
Mistake 1: Installing Helmet and Assuming You're Secure
This is the biggest mistake.
Helmet doesn't fix:
  Broken Authorization
SQL Injection
NoSQL Injection
Weak Passwords
Exposed Secrets
Insecure APIs
Missing Validation
It is one security layer.
Mistake 2: Copying a CSP From Another Project
A CSP that works for one application may break another.
Always build the policy based on your actual resource requirements.
Mistake 3: Enabling Aggressive HSTS Too Early
If your HTTPS infrastructure isn't ready, aggressive HSTS settings can create operational problems.
Test HTTPS first.
Then gradually introduce stricter policies.
Mistake 4: Ignoring Third-Party Resources
Your application might depend on:
  CDN
Analytics
Fonts
Payment Provider
Authentication Provider
Image Storage
Video Provider
A restrictive CSP can break these integrations.
Document your dependencies before creating the policy.
Mistake 5: Using Security Headers Without Understanding Proxies
If your application is behind:
  Nginx
Cloudflare
Load Balancer
Reverse Proxy
you need to understand where headers are added and how requests reach Node.js.
Otherwise, you may end up with:
  Duplicate Headers
Conflicting Headers
Incorrect Protocol Detection
Unexpected Security Behavior
Mistake 6: Treating Helmet as a Complete Security Solution
Security is a system.
A production application needs:
  Helmet
+
Rate Limiting
+
Validation
+
Authentication
+
Authorization
+
Secure Cookies
+
Password Hashing
+
Logging
+
Monitoring
+
Secure Deployment
No single middleware can provide all of this.
Testing Helmet Configuration
After enabling Helmet, test your application.
Check:
  ✓ Homepage loads
✓ Login works
✓ API calls work
✓ Images load
✓ Fonts load
✓ Scripts execute
✓ Third-party integrations work
✓ Payment systems work
✓ Authentication works
✓ Embedded content works if required
For APIs, inspect the response headers.
For example:
curl -I http://localhost:3000
You can then inspect the returned headers.
In production, verify headers through the actual deployed infrastructure because a CDN or reverse proxy may modify them.
A Practical Express Setup
A reasonable starting point might look like:
  import express from "express";
import helmet from "helmet";

const app = express();

app.use(helmet());

app.use(express.json());

app.get("/api/health", (req, res) => {
  res.json({
    status: "ok",
  });
});

app.listen(3000);
As your application grows, you might structure middleware more explicitly:
  src/
├── config/
├── controllers/
├── middleware/
│   ├── auth.js
│   ├── error.js
│   ├── rateLimit.js
│   └── security.js
├── routes/
├── services/
├── utils/
└── server.js
Then:
  // middleware/security.js

import helmet from "helmet";

export const securityMiddleware = helmet();
And:
  // server.js

app.use(securityMiddleware);
This keeps security-related configuration easier to manage as the application grows.
Production Security Checklist
Before deploying a Node.js application, review:
  ✓ Helmet configured
✓ HTTPS enabled
✓ HSTS reviewed
✓ CSP reviewed
✓ CORS configured correctly
✓ Rate limiting enabled
✓ Authentication implemented
✓ Authorization enforced
✓ Input validation enabled
✓ Secure cookies configured
✓ Passwords hashed securely
✓ Secrets stored in environment configuration
✓ Error responses don't expose internals
✓ Logging avoids sensitive data
✓ Dependencies kept updated
✓ Security headers tested
✓ Third-party resources reviewed
✓ Proxy configuration reviewed
Security is not a one-time setup.
It should be reviewed as your architecture evolves.
How Helmet Fits Into the Bigger Picture
We've now covered several important layers of Node.js application security.
A simplified architecture looks like:
                   Client
                    ↓
              HTTPS / TLS
                    ↓
              CDN / WAF
                    ↓
            Security Headers
                 Helmet
                    ↓
             Rate Limiting
                    ↓
          CORS / Cross-Origin
                    ↓
           Input Validation
                    ↓
            Authentication
                    ↓
            Authorization
                    ↓
          Business Operations
                    ↓
              Database
Each layer protects against different problems.
The goal isn't to find one magical security package.
The goal is to build a system where multiple independent controls reduce the chance that one mistake becomes a complete security failure.
What's Next?
Helmet helps protect the browser-facing layer of your Node.js application.
But security doesn't stop at HTTP headers.
Your application also needs to ensure that incoming data is valid before it reaches your business logic and database.
That's where input validation becomes critical.
In the next article, we'll explore Input Validation in Node.js and learn how to validate:
- Request bodies
- Query parameters
- Route parameters
- Emails
- Passwords
- IDs
- Nested objects
- Arrays
- File metadata
We'll also discuss why validation should happen at the API boundary and how validation differs from sanitization.
Conclusion
Helmet.js is a valuable security tool for Node.js and Express applications.
It helps configure security-related HTTP response headers that can instruct browsers to enforce important security policies.
The most important concepts to understand are:
- Content Security Policy
- HSTS
- MIME sniffing protection
- Clickjacking protection
- Referrer policies
- Cross-origin policies
But the most important lesson is this:
Helmet is a security layer, not a complete security solution.
A production-ready Node.js application should combine:
  Helmet
   +
HTTPS
   +
Rate Limiting
   +
CORS
   +
Input Validation
   +
Authentication
   +
Authorization
   +
Secure Password Storage
   +
Secure Cookies
   +
Logging
   +
Monitoring
Start with:
app.use(helmet());
Then understand what your application actually needs.
Review your headers.
Test your frontend.
Check your third-party integrations.
Configure CSP carefully.
Understand your proxy and deployment architecture.
And never rely on a single middleware package to solve application security.
Good security is layered, intentional, and continuously maintained.