Node.js Child Process Module Explained: Run System Commands and External Programs
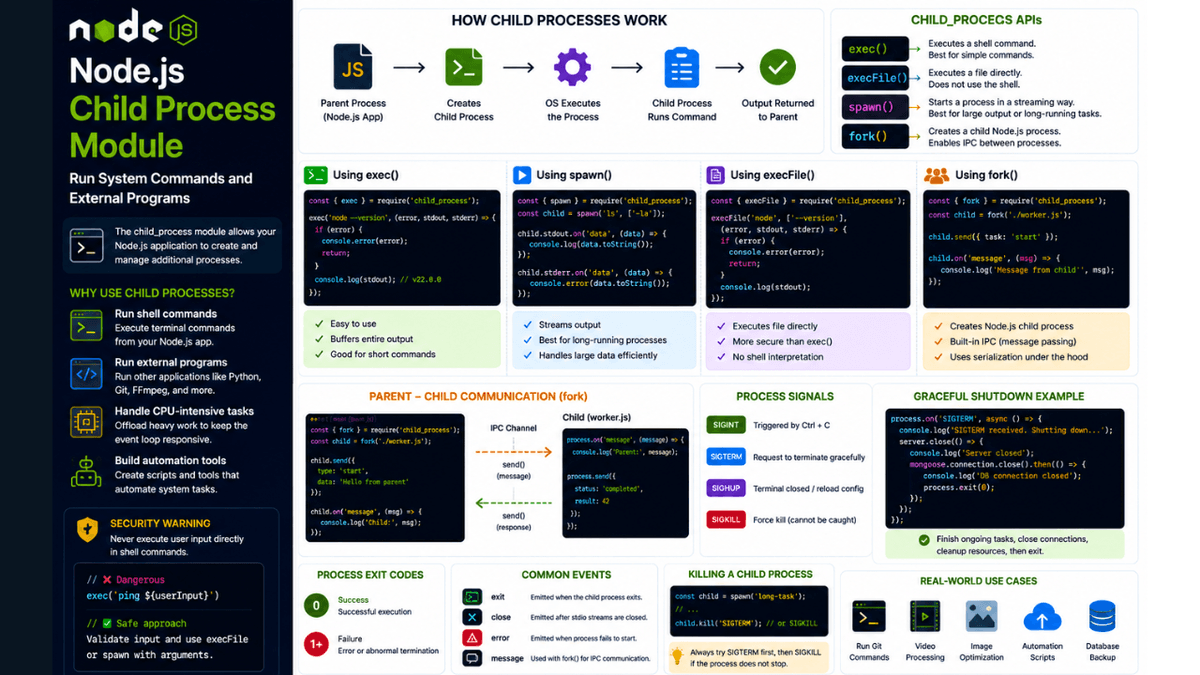
Learn how to use the Node.js Child Process module to execute system commands, run external programs, create child processes, and communicate between parent and child processes.
Node.js Child Process Module Explained: Run System Commands and External Programs
Node.js is excellent at handling web requests, APIs, file operations, and asynchronous tasks.
But sometimes your application needs to do something outside of Node.js itself.
For example, you might want to:
- Run a terminal command
- Execute a Python script
- Run a shell command
- Process a large file
- Generate an image using an external program
- Execute a system utility
- Run another Node.js application
This is where the Node.js Child Process module becomes useful.
The child_process module allows your Node.js application to create and manage additional processes.
In the previous article, we explored Node.js Process Management , including parent and child processes. Now we'll learn how to actually create and communicate with child processes.
What is a Child Process?
A child process is a process created by another process.
The process that creates it is called the parent process .
  Parent Process
      │
      ├── Child Process 1
      ├── Child Process 2
      └── Child Process 3
In Node.js, the parent application can start another process using the built-in:
child_process
module.
This gives Node.js applications the ability to interact with the operating system.
Why Use Child Processes?
Child processes are useful when you need to perform work outside the Node.js runtime.
Common examples include:
Running Shell Commands
git status
Running Other Programs
  Python
FFmpeg
Git
ImageMagick
CPU-Intensive Operations
Some operations can block the Node.js event loop.
Moving certain workloads into separate processes can help keep the main application responsive.
Automation
You can build Node.js applications that automate system tasks.
For example:
  Node.js Application
       ↓
Run Backup Script
       ↓
Compress Files
       ↓
Upload Backup
Importing the Child Process Module
The module is built into Node.js.
CommonJS:
const { exec } = require("child_process");
ES Modules:
import { exec } from "child_process";
The module provides several APIs:
-
exec() -
execFile() -
spawn() -
fork()
Each one is designed for different use cases.
Using exec()
The exec() function allows you to execute a shell command.
Example:
  const { exec } = require("child_process");

exec("node --version", (error, stdout, stderr) => {
  if (error) {
    console.error(error);
    return;
  }

  console.log(stdout);
});
Example output:
v22.0.0
The command is executed as if you ran it in your terminal.
Understanding exec() Callback
The callback receives three important values:
  exec("command", (error, stdout, stderr) => {
});
error
Contains information if the command fails.
stdout
Contains normal command output.
stderr
Contains error output generated by the command.
Example:
  exec("unknown-command", (error, stdout, stderr) => {
  if (error) {
    console.log("Command failed");
  }

  console.log(stderr);
});
Always handle errors when executing external commands.
Running Git Commands
Node.js can execute Git commands.
  exec("git status", (error, stdout) => {
  if (error) {
    console.error(error);
    return;
  }

  console.log(stdout);
});
This capability is useful when building developer tools and automation systems.
For example, you could create a CLI that automatically checks repository status.
Using spawn()
spawn() is useful when working with processes that produce a large amount of output or continue running for a long time.
Example:
  const { spawn } = require("child_process");

const child = spawn("node", ["app.js"]);

child.stdout.on("data", (data) => {
  console.log(data.toString());
});

child.stderr.on("data", (data) => {
  console.error(data.toString());
});
Unlike exec() , spawn() uses streams to handle output.
This makes it more suitable for long-running processes and large amounts of data.
If you've already studied Node.js Streams , this concept should feel familiar.
The output is processed incrementally rather than waiting for the entire command to finish.
exec() vs spawn()
A simple comparison:
| Feature | exec() | spawn() |
|---|---|---|
| Shell command | Yes | Usually direct process |
| Output handling | Buffered | Streamed |
| Large output | Less suitable | Better |
| Long-running process | Less suitable | Better |
| Simple commands | Excellent | Good |
A simple rule:
Use exec() for short commands.
Use spawn() for long-running processes or large output.
Using execFile()
execFile() executes a specific executable file directly.
Example:
  const { execFile } = require("child_process");

execFile("node", ["--version"], (error, stdout) => {
  if (error) {
    console.error(error);
    return;
  }

  console.log(stdout);
});
This can be safer and more efficient than using a shell when you don't need shell features.
Using fork()
The fork() function is designed specifically for creating new Node.js processes.
Example:
  const { fork } = require("child_process");

const child = fork("worker.js");
Now you have:
  Main Node.js Process
        │
        │ fork()
        ↓
Child Node.js Process
The child process runs its own Node.js instance.
Parent-Child Communication
One of the most useful features of fork() is inter-process communication.
The parent can send a message:
  child.send({
  type: "start",
  data: "Hello"
});
The child can receive it:
  process.on("message", (message) => {
  console.log(message);
});
The child can send a message back:
  process.send({
  status: "completed"
});
This creates a communication channel between the processes.
Example: Parent Process
  const { fork } = require("child_process");

const child = fork("worker.js");

child.send({
  task: "calculate"
});

child.on("message", (message) => {
  console.log("Child response:", message);
});
Example: Child Process
  process.on("message", (message) => {
  if (message.task === "calculate") {
    process.send({
      result: "Calculation complete"
    });
  }
});
This pattern is useful when separating workloads into independent processes.
Child Processes and the Event Loop
Node.js uses a single JavaScript thread for the main event loop.
If you perform heavy synchronous CPU work directly inside that thread, you can block the event loop.
For example:
  while (true) {
  // CPU-intensive work
}
This would prevent the server from responding to requests.
Moving suitable workloads into separate processes can help isolate the work.
However, child processes aren't automatically the best solution for every CPU-intensive task.
Node.js also provides Worker Threads , which are designed specifically for running JavaScript code in parallel threads.
We'll explore Worker Threads in the next article.
Security Warning: Never Trust User Input
This is extremely important.
Never directly execute user-provided input.
Dangerous example:
exec(`ping ${userInput}`);
If the input is not validated, an attacker could potentially inject additional commands.
For example, malicious input might attempt to execute:
command1 && command2
This can lead to command injection vulnerabilities.
Instead:
- Validate input
- Use allowlists
- Avoid shell execution when possible
- Prefer
execFile()orspawn() - Never concatenate untrusted input into shell commands
Security should always come before convenience.
Handling Process Exit
You can listen for the child process to exit:
  child.on("exit", (code) => {
  console.log(`Process exited with code ${code}`);
});
You can also listen for the close event:
  child.on("close", (code) => {
  console.log("Process closed:", code);
});
These events help you determine whether the process completed successfully.
Killing a Child Process
You can terminate a child process using:
child.kill();
This is useful when:
- A task takes too long
- A user cancels an operation
- A process becomes unresponsive
- The application is shutting down
This connects directly with the process signal concepts we discussed in the previous Node.js Process Management article.
Real-World Applications
Child processes are used in many types of applications.
Video Processing
  Node.js
   ↓
FFmpeg Process
   ↓
Video Conversion
Image Processing
  Node.js
   ↓
Image Processing Tool
   ↓
Optimized Image
Developer Tools
  CLI
 ↓
Git Commands
 ↓
Repository Information
Automation Systems
  Node.js
 ↓
Shell Script
 ↓
Backup
 ↓
Compression
These are practical examples of how Node.js can interact with the wider operating system.
Common Beginner Mistakes
Using exec() for Huge Output
exec() buffers output in memory.
For large or continuous output, consider spawn() .
Executing Untrusted Input
Never pass raw user input directly into shell commands.
Forgetting Error Handling
External processes can fail for many reasons.
Always handle:
- Errors
- Exit codes
-
stderr - Process termination
Creating Too Many Processes
Every process consumes resources.
Process creation should be intentional and based on actual workload requirements.
Child Process vs Worker Threads
It's important to understand the difference.
Child Process
Creates a separate operating system process.
  Process A
   +
Process B
Each process has its own memory.
Worker Thread
Runs JavaScript in another thread within the same Node.js process.
  Node.js Process
    ├── Main Thread
    └── Worker Thread
Worker Threads are often better suited for CPU-intensive JavaScript calculations.
Child processes are better when you need to execute external programs or isolate separate processes.
Conclusion
The Node.js Child Process module gives applications the ability to interact with the operating system and execute work outside the main Node.js process.
With APIs like:
-
exec() -
execFile() -
spawn() -
fork()
you can build powerful automation tools, developer utilities, processing systems, and backend applications.
The key is choosing the right API for the job.
Use simple commands with exec() , streaming workloads with spawn() , direct executables with execFile() , and Node.js-to-Node.js communication with fork() .
Most importantly, never forget security. Executing system commands is powerful, but executing untrusted input can be extremely dangerous.
Once you understand child processes, you're ready to explore the next layer of Node.js concurrency: Worker Threads .