Build a CLI Tool with Node.js: Create Your First Command Line Application
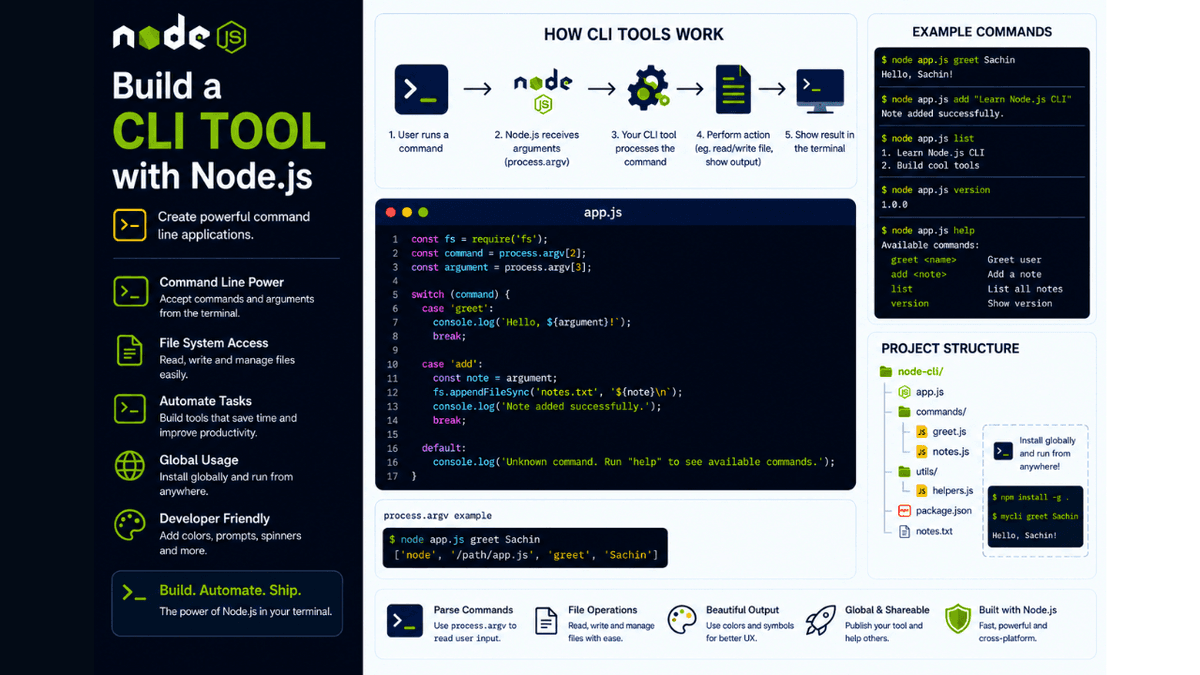
Learn how to build a Command Line Interface (CLI) tool with Node.js. Understand command-line arguments, process.argv, file operations, and create practical automation tools from scratch.
Build a CLI Tool with Node.js: Create Your First Command Line Application
Most developers think of Node.js as a technology for building web servers and REST APIs.
While that's true, Node.js is also one of the best platforms for creating Command Line Interface (CLI) applications.
In fact, many tools you use every day—such as npm , npx , create-next-app , and eslint —are all CLI applications built with Node.js.
In this article, we'll build a simple CLI tool from scratch and learn how Node.js interacts with the operating system through the terminal.
What is a CLI Tool?
A Command Line Interface (CLI) tool is a program that runs inside a terminal instead of a browser.
Rather than clicking buttons, users interact with the application by typing commands.
For example:
node app.js greet Sachin
Output:
Hello, Sachin!
CLI tools are commonly used for:
- Automating repetitive tasks
- Generating project files
- Managing databases
- Deploying applications
- Running build processes
- Creating developer utilities
If you've used commands like npm install or git commit , you've already used CLI applications.
How CLI Applications Work
When you execute a command:
node app.js greet Sachin
Node.js receives the command-line arguments through the process.argv array.
Example:
console.log(process.argv);
Output:
  [
  '/usr/local/bin/node',
  '/project/app.js',
  'greet',
  'Sachin'
]
The first two values are added automatically by Node.js.
Everything after that comes from the user.
If you're unfamiliar with the process object, it's worth reviewing our earlier article on the Node.js Process Object , since it powers most CLI applications.
Project Structure
  node-cli/
│
├── app.js
├── package.json
├── commands/
│   ├── greet.js
│   └── notes.js
└── utils/
Separating commands into their own files keeps the project maintainable as it grows.
Reading Command-Line Arguments
Example:
  const command = process.argv[2];
const name = process.argv[3];

console.log(command);
console.log(name);
Command:
node app.js greet Sachin
Output:
  greet
Sachin
Now our application understands user input.
Building a Greeting Command
  const command = process.argv[2];
const name = process.argv[3];

if (command === "greet") {
  console.log(`Hello, ${name}!`);
}
Run:
node app.js greet Sachin
Output:
Hello, Sachin!
Although this is a simple example, it introduces the same routing concept we used when matching HTTP routes in our REST API projects—except here we're routing terminal commands instead of URLs.
Creating Multiple Commands
  switch (command) {
  case "greet":
    console.log("Hello!");
    break;

  case "version":
    console.log("1.0.0");
    break;

  default:
    console.log("Unknown command.");
}
This pattern scales well as your CLI grows.
Reading Files
Suppose we want to read a text file.
  const fs = require("fs");

const content = fs.readFileSync("notes.txt", "utf8");

console.log(content);
This uses the same File System ( fs ) module we've already explored throughout this Node.js series.
Writing Files
Creating files is just as simple.
  fs.writeFileSync(
  "notes.txt",
  "Learn Node.js CLI"
);
Now our CLI can generate files automatically.
Building a Notes CLI
Imagine creating notes directly from the terminal.
Command:
node app.js add "Learn Streams"
Example implementation:
  const note = process.argv[3];

fs.appendFileSync(
  "notes.txt",
  `${note}\n`
);

console.log("Note added successfully.");
Output:
Note added successfully.
This demonstrates how CLI applications can automate everyday tasks.
Using Colors in the Terminal
Many CLI tools use colored output for better readability.
Example:
  ✔ Success
⚠ Warning
✖ Error
Popular libraries such as Chalk make terminal output easier to read and improve the developer experience.
Making a Global CLI Tool
Instead of running:
node app.js greet
you can install your CLI globally.
Example:
npm install -g .
Now you can execute:
mycli greet Sachin
This is exactly how tools like npm , npx , and create-next-app work.
Useful CLI Features
As your project grows, you can add:
- Help menus
- Configuration files
- Interactive prompts
- Auto-complete
- Progress bars
- Spinners
- Logging
- Validation
These features make your CLI feel professional.
Common Beginner Mistakes
Ignoring Invalid Commands
Always provide helpful feedback.
Instead of:
Nothing happens
Return:
Unknown command. Run "help" to see available commands.
Hardcoding Values
Avoid writing fixed file names or directories.
Accept user input whenever possible.
Forgetting Error Handling
File operations can fail.
Always handle exceptions.
  try {
  fs.readFileSync("notes.txt");
} catch (error) {
  console.log("File not found.");
}
Robust CLI tools anticipate failures and provide meaningful messages.
Real-World Examples
Many popular developer tools are built with Node.js:
- npm
- npx
- ESLint
- Prettier
- Vite
- Create React App
- Create Next App
Understanding how these tools work will make you a more effective developer.
Conclusion
Building a CLI tool demonstrates that Node.js is far more than a backend web framework.
It can automate tasks, generate files, manage projects, and power developer tools used by millions every day.
By learning how to work with command-line arguments, the file system, and the process object, you've gained practical skills that extend beyond web development.
Whether you're creating your own productivity tool or contributing to open-source developer utilities, CLI applications are an excellent way to deepen your Node.js expertise.