Testing APIs using Postman
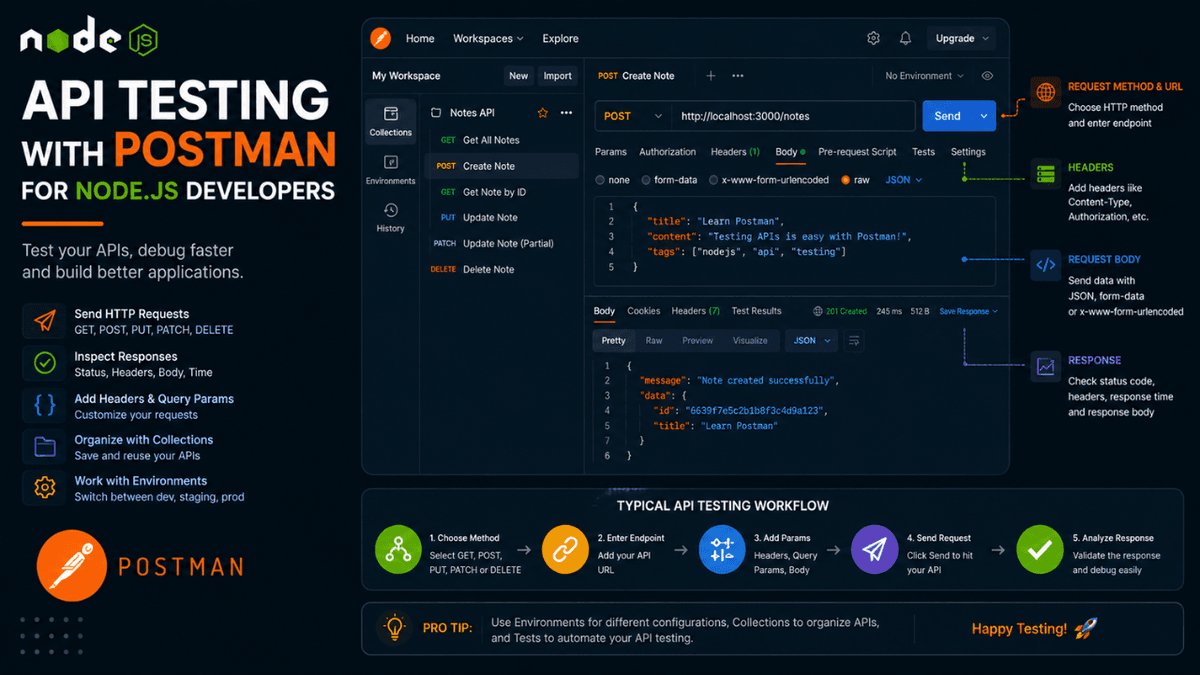
Learn how to test Node.js APIs using Postman. Understand requests, responses, headers, query parameters, environments, collections, and API debugging workflows.
API Testing with Postman: Complete Guide for Node.js Developers
Building an API is only half the job.
The other half is making sure it actually works.
Before frontend developers connect their applications, backend developers need a way to verify endpoints, inspect responses, debug issues, and validate business logic.
This is where Postman becomes one of the most valuable tools in a Node.js developer's workflow.
If you've followed the previous articles in this series, you've already built APIs using GET, POST, PUT, PATCH, and DELETE requests. Postman allows you to test all of these endpoints without writing frontend code.
What is Postman?
Postman is an API development and testing tool that allows developers to send HTTP requests and inspect server responses.
Instead of creating a frontend application just to test an endpoint, Postman lets you communicate directly with your API.
For example, you can:
- Send GET requests
- Create resources using POST
- Update resources using PUT or PATCH
- Delete resources using DELETE
- Test authentication tokens
- Validate headers
- Inspect response times
This makes development significantly faster.
Why Developers Use Postman
Imagine building a Notes API.
Without Postman:
- Build backend API.
- Build frontend UI.
- Connect frontend to backend.
- Discover API bug.
- Repeat the process.
With Postman:
- Build backend API.
- Test endpoint immediately.
- Fix issue instantly.
This shorter feedback loop improves productivity and debugging speed.
Installing Postman
You can download Postman for:
- Windows
- macOS
- Linux
Most developers use the desktop application because it provides a better testing experience for local development environments.
Once installed, create a free account or continue using it locally.
Understanding the Postman Interface
The main parts of Postman include:
Request Method
Choose the HTTP method:
- GET
- POST
- PUT
- PATCH
- DELETE
These should already feel familiar if you've completed the previous CRUD articles in this series.
URL Field
Example:
http://localhost:3000/users
This tells Postman which endpoint to call.
Headers
Headers contain additional information about the request.
Example:
  Content-Type: application/json
Authorization: Bearer token_here
If you haven't explored headers deeply yet, our upcoming article on HTTP Headers Explained will cover them in detail.
Request Body
Used primarily with:
- POST
- PUT
- PATCH
Example:
  {
  "name": "Sachin",
  "email": "sachin@example.com"
}
Response Section
Postman displays:
- Status code
- Response body
- Headers
- Response time
- Response size
This makes debugging much easier.
Testing GET Requests
Select:
GET
URL:
http://localhost:3000/users
Click:
Send
Response:
  [
  {
    "id": 1,
    "name": "Sachin"
  },
  {
    "id": 2,
    "name": "Rahul"
  }
]
This is usually the first endpoint developers test after creating an API.
Testing POST Requests
Select:
POST
URL:
http://localhost:3000/users
Body:
  {
  "name": "Sachin",
  "email": "sachin@example.com"
}
Response:
  {
  "message": "User created successfully"
}
This directly relates to the POST request handling we implemented in our previous article on POST Requests in Node.js .
Testing PUT Requests
Select:
PUT
URL:
http://localhost:3000/users/1
Body:
  {
  "name": "Sachin Raval",
  "email": "sachinraval@example.com"
}
The server replaces the entire resource.
Testing PATCH Requests
Select:
PATCH
Body:
  {
  "name": "Sachin Raval"
}
Only the provided fields change.
Understanding the difference between PUT and PATCH becomes much easier once you can compare their behavior side by side inside Postman.
Testing DELETE Requests
Select:
DELETE
URL:
http://localhost:3000/users/1
Response:
  {
  "message": "User deleted successfully"
}
You can immediately verify whether the resource was removed successfully.
Working with Query Parameters
Example:
GET /products?page=1&limit=10
Postman provides a dedicated Params tab where you can add:
| Key | Value |
|---|---|
| page | 1 |
| limit | 10 |
Postman automatically builds the URL.
Working with Headers
Example:
  Content-Type: application/json
Authorization: Bearer your_token_here
Headers become essential when working with authentication systems and protected routes.
Later in this series, when we cover JWT authentication and authorization, you'll use Postman extensively for testing tokens.
Working with Environment Variables
Instead of writing:
http://localhost:3000
every time, you can create:
{{base_url}}
Example:
{{base_url}}/users
Now changing environments becomes easy:
Development:
http://localhost:3000
Production:
https://api.example.com
This is one of the most useful Postman features for professional teams.
Collections
Collections allow you to organize requests.
Example collection:
  Notes API
├── GET Notes
├── POST Note
├── PATCH Note
├── DELETE Note
Collections make testing large APIs significantly easier.
Common Status Codes You'll See
| Status Code | Meaning |
|---|---|
| 200 | Success |
| 201 | Created |
| 204 | No Content |
| 400 | Bad Request |
| 401 | Unauthorized |
| 403 | Forbidden |
| 404 | Not Found |
| 500 | Internal Server Error |
Understanding these responses makes debugging much faster.
Common Beginner Mistakes
Forgetting Content-Type Header
Wrong:
No Content-Type header
Correct:
Content-Type: application/json
Sending Invalid JSON
Wrong:
  {
  name: "Sachin"
}
Correct:
  {
  "name": "Sachin"
}
Testing the Wrong HTTP Method
Sending:
GET /users
when the endpoint expects:
POST /users
will often result in confusing errors.
Always verify the request method before debugging the server.
Real World Usage
Professional developers use Postman for:
- API development
- Team collaboration
- Authentication testing
- API documentation
- Automated testing
- Regression testing
Many companies use Postman collections as part of their development workflow.
Conclusion
Postman is one of the most important tools in a backend developer's toolkit.
It removes the dependency on frontend applications and allows you to test APIs quickly and efficiently.
Learning Postman early will make debugging easier, development faster, and collaboration smoother.
If Node.js is your backend engine, Postman quickly becomes your best friend during API development.